

Showing posts with label vegetarian. Show all posts
Showing posts with label vegetarian. Show all posts
Saturday, March 26, 2011
Artichoke, Chive and Goat Cheese Fritatta
Wednesday, November 24, 2010
Orange and Ginger Spiced Cranberry Sauce

Here we are! Only one day left to roll out all that food! Get your engines running and grab those elastic - wasted pants and let the holidays officially begin. I've got a million things to do and little time so I'm just going to blast this one out before hitting the road dutifully armed with some capers, Brussles Sprouts and this cranberry sauce.
I had a last minute thought last night as I had was cleaning out the fridge and noticed some organic cranberries just staring back at me. (Random grocery purchase by the husband?). Anyway, I just started tossing a little bit of this and a little bit of that into the pan and I'll be, it's pretty darn good! I love it when that happens! Give it a try if you are feeling adventurous.
Here's to a happy and healthy Thanksgiving! Cheers!
Tuesday, November 16, 2010
Roasted Brussels Sprouts with Butter, Lemon, Dijon and Capers

Brussels Sprouts might be most under-appreciated and most detested vegetable on the planet. It's a sad and unfortunate truth! I think I know why these poor little cruciferae suffer from such misguided hate. It started a long time ago... In a kitchen near you... a pile of pale green, boiled to death, mushy mini cabbages sitting lifelessly on a plate with a weird cabbage-y bitter smell filling the kitchen, cutting through whatever else was cooking that made you instantly un-hungry for dinner. Dinner hopes dashed, appetite gone. This, I believe, is how most of us were served our Brussels sprouts back in the day. And it wasn't good. Or pretty.
Now, let's start over. Close your eyes and imagine beautifully roasted, slightly caramelized and glistening, beautiful baby Brussels sprouts rolling around in a delightful, aromatic combination of garlic, Dijon mustard, lemon juice and capers, oh, and butter. Roasted first, then left to steam so that each bite is perfectly al dente. Not squishy mushy and not hard and under cooked, but just right. Welcome to the new millennium of The. Brussels. Sprout.
Tuesday, July 27, 2010
Mac 'n Cheese

The surprising element to this is that I NEVER make it for myself. I'm perfectly happy with a few choice frozen "entrees". (Amy's is good and Trader Joes' is AMAZING). It's all too easy to pop in the oven and sit back wait for the oozing gooey cheesy one million calorie mess of deliciousness. (Served with an enormous side of sauteed kale some how makes me feel healthy and almost guilt-free.)
Thursday, July 15, 2010
Zucchini Ricotta Galette

Since zucchini is well into their season, and usually in super-abundance, (and especially if you are growing your own and can't figure out a new way to use them), here you go... Ricotta and Parmesan lay down the creamy, tangy, simply luxurious foundation. Play around with your fillings, once you make your first galette, you will start to roll countless ideas around in your foodie imagination. My advise, go forth with wild abandon!
Keep in mind, you are making a pastry dough, so all ingredients need to be cold, cold, cold and handled to a bare minimum for a flaky crust.
Friday, May 7, 2010
Pan Seared Haloumi with Fresh Favas

Haloumi is a mild yet salty cheese hailing from Greece. It's made from either goats or sheep's milk. I've used it a few times and I think I'll be using it more as I have fallen deeply in love with it. It's charm is in it's firm texture, as you can grill or pan fry it without it turning in to a big gooey mess. This Greek staple is a brilliant substitute for meat and it's especially wonderful with fresh herbs and sweet, ripe tomatoes. A robustly salty and chewy texture is unlike any other cheese you've had and is wonderful grilled and simply finished with a squeeze of lemon. It's the perfect summer addition to your up-coming cook-outs!
Thursday, February 25, 2010
Ruby Red Grapefruit and Avocado Salad

As I sit in front of a very angry Pacific Ocean, (our weekend get-away rental is perched, literally, on top of the sea, where the weather isn't exactly cooperating with my idea of beach weather), I have decided to imagine that it's hot outside, (like it was last year), and that I will be eating this salad for lunch...
Yvette and I did this photo shoot ages ago and it kinda got lost in the shuffle, but what better time to share this beautiful salad with you as we could all use a reminder that spring is around the corner, and this salad is perfect for lunch on a warm day. With buttery avocados, crunchy hazelnuts, and juicy pink grapefruit segments, this bright, cheery salad is simply lovely. I like to serve it for brunch with a hearty veggie fritatta and bubbly mimosas.
Wednesday, February 24, 2010
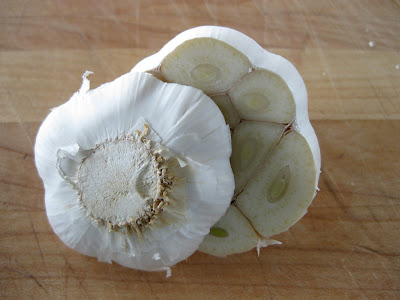
Roasted Garlic and Broccoli Soup

Buying a giant bunch of beautiful broccoli right before we take off for a long weekend may not have been the wisest of decisions, or was it?? Now that my kitchen is filled with the smell of roasted garlic, and dinner is well on it's way to being finished, I'm thinking that my impetuousness was more of a stroke of pure genius.
Making veggie soups are simple, and a wonderful way to clean out that fridge. By adding roasted garlic, you turn an ordinary soup in to something a little more special. You might as well roast a few heads of garlic, while you have the oven on - they are great to have on hand. They should keep about a week in the fridge.

Roasted Garlic and Broccoli Soup
Borrowed from The Los Angeles Times
Serves 6 - 8
1 large, plump head of garlic
pinch of salt and pepper
drizzle of olive oil
1 large bunch of broccoli
2 TBLS butter or olive oil
1 medium onion, diced
1 large baking potato, peeled and cubed into 1 '' dice
6 cups chicken or vegetable broth
salt and pepper to taste
Preheat oven to 375.
Slice the top 1/4 off the head of garlic. Drizzle olive oil over head of garlic, season with salt and pepper and place the top back over the head. Wrap in tin foil and roast until tender, about 45 minutes. Set aside to cool.
While garlic is roasting, heat oil or butter in a large pot, and sweat onions for about 5 minutes and add chopped broccoli florets and potato cubes. Add stock and bring to a boil.
Partially cover and simmer for about 30 minutes, or until potato is cooked thoroughly.
Once the roasted garlic is cool enough to handle, squeeze the roasted cloves into the soup.
Season with salt and pepper.
Puree soup in batches, or (better yet!), use an immersion blender. Serve soup hot.

Sunday, October 25, 2009
Spanakopita

We all have that one certain meal that makes us shuffle our feet and bob our heads in utter happiness. We instantly feel safe and comforted -- no matter what might be going on in our grown-up lives. For me, it's Spinach Pie, or Spanakopita, if you happen to find yourself in Greece. I would eat dozens of "pitas" every summer at my grandparents' home on Long Island. In their tiny kitchen, we would set up a factory line-like production. One of us would man the phyllo dough, both keeping it from drying and ever-so gently handing over one sheet at a time to the next person in the assembly line. That person, would be in charge of painting melted butter across sheet after sheet like an abstract painter,(a kid's job, no doubt!). Then came the job of spooning out the filling, (usually my grandmother), and carefully rolling the dough into tight bite-sized triangles. It's because of this hands-on family tradition that I am not only well-trained at making my own, but it also has a special place in my heart, a rare moment with generations of women in one kitchen at the same time. (Grandma is still with us, at 94 years young!)
This is a fairly labor-intensive project, so when the mood strikes me, I go for it. I'll make about a dozen and a half, so I will freeze what I don't immediately eat for a later time. If you have never worked with phyllo dough before, it's a fantastic vessel for both savory and sweet recipes. It is, however, a pain to work with, so be prepared to loose a few sheets from either drying out, or tearing. The best way to keep phyllo as your friend, is to roll it out and keep it covered with a barely damp tea towel. (If you towel is too wet, it will ruin the very thin sheets of dough and make them gooey and un-usable). Phyllo dough must be layered sheet upon sheet, (about 5 sheets), in order to be strong enough to hold up to whatever you might be filling inside. Between each layer, paint with a pastry brush, either melted butter or olive oil. You don't have to saturate each layer, but do get all the sides and a majority of each sheet should be moist.

Spanakopita
Makes about one and a half dozen pitas
2 lbs spinach, washed
1 yellow onion, diced
drizzle of olive oil
about 3/4 lbs feta cheese
1 cup chopped fresh parsley
1/2 cup toasted pine nuts
pinch or two of freshly grated nutmeg
salt and pepper
juice from 1 lemon
1 package of PHYLLO DOUGH, thawed. (usually in frozen dessert section)
1 stick of unsalted butter, melted. (or about 1/2 cup of olive oil)
1 stick of unsalted butter, melted. (or about 1/2 cup of olive oil)
Preheat oven to 375
In a large pot, saute spinach and the drain very well, pressing out any extra liquid.
In a medium saute pan, heat oil and saute diced onion until transparent.
Once spinach and onions are cool, combine in a large bowl, along with parsley, feta, pine nuts, nutmeg, salt and pepper and lemon juice. Taste this and alter any seasonings.


To Assemble:
Make sure phyllo has completely thawed out if frozen.
Unwrap phyllo and lay out flat. Cover with a barely damp tea towel, keep covered through out this process.
Find a clean working space (I use a large cutting board). Start with one layer at a time. Lay first layer down and working with a pastry brush, paint butter over sheet, not soaking, but relatively coated.
Place second sheet on top of buttered sheet and repeat 5 times, keeping the last layer dry -
NO BUTTER.
If you find that your phyllo is tearing, you can patch it by over-lapping each little torn piece and using the melted butter or oil to seal the places where you have improvised.
Cut 3 even strips down the sheets, about 2.5 inches apart. You will have 4 columns.
At the top of each column, drop about 2 tbls spinach mixture and begin to roll each column into a triangle (see below). Paint a little extra butter over the triangle and seal up any unsealed edges.
Place on a baking sheet with parchment paper. Bake until golden brown and crispy, about 25 minutes. Serve hot.
Note: These can be made vegan by replacing butter with olive oil and firm tofu replaces feta.


Sunday, September 20, 2009
Wild Rice and Apple Salad

One of my all time favorite salads! It usually begins with left over rice from the night before, (If I'm being smart, I will make extra rice for this very reason.). Since I always have apples in the fridge and an assortment of raw nuts in the pantry, this salad comes together easily. Throw whatever happens to be in the fridge, (parsley, dried cranberries, pine nuts and crumbled goat cheese this time), and you'll have a healthy and filling meal in mere minutes.
I have found that making wild rice with chicken or vegetable stock and a pat or two of butter really makes a world of difference. This salad can be made with any grain, try it with quinoa, brown rice, farro, etc. There are no rules for this salad - here's your chance to get creative and clean out that fridge all at the same time. Enjoy!
Wild Rice and Apple Salad
2 cups cooked rice
1 apple - I like Gala or Fuji
1/2 cup nuts, I like pine nuts or walnuts
1 TBLS (or more) chopped fresh herb such as parsley, mint, basil.
Handful of dried cranberries
Crumbled goat cheese, or feta - to you liking
Salt and pepper
Olive oil
Lemon juice
Combine everything in a large bowl. Season with salt and pepper, and drizzle with olive oil (or walnut oil) and fresh lemon juice - adjust to your liking. Serve over a bed of mixed baby greens.


Thursday, August 27, 2009
Hail to the Farmer!

It's something - going to the Farmer's market. The seasons predict the bounty, and the farmers bring us the fruits, (literally), of all their labor. The beauty is that it's offerings are fleeting, there a few weeks, then gone for a year. It's kind of romantic, like a love lost, found again.
As I walked through yesterday, I had an idea of what I wanted, (usually I blank out completely, due to sensory over-load), but it is deathly hot right now and I knew that a salad was in our future. Passing by an organic heirloom tomato stand helped steer me in the right direction. As it happened, the next stand over had beautiful ears of corn which also caught my attention and then it was all over, a light bulb moment, I was finished. I picked up an herbed salad mix and basil from my favorite lettuce stand, Maggie's Farms, (out of Agoura Hills, CA. The "stellar mix", a combination of every possible herb, wild flowers and baby lettuces is so good, I eat it straight from the bag).
I have a particular fondness for the combination of fresh corn, summer tomatoes, goat cheese and basil - hopefully you will share my affection...

Farmer's Market Greens with Tomato-Corn Relish, topped with Goat Cheese Medallion
Serves 4
Bag of herbed mixed greens (the herbs really make this salad, so if you can't find an herb mix, buy some baby greens or arugula and add a variety of herbs - trust me, the more herbs, the better).
2 ears of corn, roasted and kernels removed
1-2 tomatoes, I used the Brandywine heirloom variety, chopped
Basil, chopped thinly
Scallions, chopped thinly
8 oz. goat cheese
1 1/2 cup panko-style Japanese bread crumbs
1 egg
Juice of 1 lemon
Olive oil
Salt and pepper to taste
Step 1: Goat Cheese Medallions
Prepping the medallions:
(Can be done up to one day in advance, covered and refrigerated)
Leave goat cheese out to room temp. Form 4 round and flat medallions, think hockey puck. Place on a plate and put in the refrigerator for at least a half hour, to harden.
Once hardened, whisk one egg in a bowl and place panko crumbs in a separate bowl.
Working gently, one at a time, roll medallions first in egg, then coat with panko crumbs. Once all 4 are coated, return to refrigerator until ready to prepare.
Cooking Instructions:
(This should be done just before service, with the rest of the salad components prepared).
Heat a heavy pan, (I use a cast iron), add olive oil, enough to fry in, about 1/8 cup), add medallions and cook for about 2-3 minutes, the crumbs should look nice and golden. Gently flip with a spatula, and cook another 2-3 minutes. Carefully remove from heat, again with a spatula, and let rest on a paper bag or paper towel to drain excess oil.
Step 2:
Tomato - Corn Relish
Heat cast iron skillet to med - high and place corn in it. Rotate every few minutes, it will char and cook nicely this way. You can also grill it.
Chop tomatoes, scallions and basil and combine in a bowl.
Add corn kernels and drizzle juice of one lemon and olive oil, season with salt and pepper. Toss gently and set aside.
Step 3:
Assembly
Place salad greens on a plate, with your hands, gently place tomato and corn relish over greens. Add hot goat cheese medallion to the top of relish, season freshly ground pepper.
Serve with a crisp white wine.


Thursday, July 9, 2009
July 4th, a Retrospective...part II

GRILLED CORN
After an afternoon of soaking up sun, sipping (guzzling), off a pitcher of watermelon tequila deliciousness, it was time to spark up the grill and begin the best part of any party, the food part. It was about 6:30, and with ample sun, Harriet, still homesick from her recent visit to her parents' home, grabbed the corn and began shuckin' like the good Jersey girl that she is. The plan for the corn was easy enough, remove almost all the husk, saving the fine last layer and then simply throwing it on the grill. Rotating it every so often, it's ready in about 10 minutes. We then strategically placed butter and salt on the hot corn and set it aside until the rest of the meal was ready, all just in time to watch the sunset and before the fireworks lit up the sky.


Saturday, April 25, 2009
MMMM, MISO!
 There is something that the Japanese have known for centuries, miso soup is a cheap, easy and an extremely health-supportive meal. In Japan, it is eaten on a daily basis, which might explain why the Japanese have lower rates of cancer, heart disease and high cholesterol than Americans. Ideally, I have a pot in the fridge ready so that I can help myself each morning. All I need are a few veggies, some tofu, some type of seaweed (wakame or arame), and maybe some noodles and I'm on my way. Below is only a suggestion of what you can add to miso broth to make a hearty meal. What is important is that you follow the directions on how to incorporate miso to the hot water while making your soup. (Boiling miso will ruin it's beneficial properties.)
 A word about miso:
Miso pastes are generally made from fermented soybeans, however others include fermented rice, barley or chickpeas. Each variety differs in flavor - some are intensely rich and salty, while the lighter miso pastes are sweet and mild. The health benefits of miso are quite profound. Studies prove eating a bowl of miso a day largely decreases the chance of breast cancer, due to its ability to regulate the hormone, oestrogen, which causes tumors to develop. Miso is also rich in antioxidants and healthy fatty acids. It is high in protein and Vitamin B12, (a vitamin many vegetarians and vegans lack).
Similar to yogurt, miso contains probiotics, or beneficial bacteria, which is necessary to maintain healthy flora in your intestinal tract. Miso contains the same active, live cultures found in yogurt, which is why it is extremely important NOT TO BOIL miso soup, as it will kill these cultures. If you are on antibiotics, a bowl of miso a day is ideal as it adds the healthy bacteria back to keep your intestines happy. (Antibiotics strip us of all bacteria - good and bad.).
Miso paste can be found in any health food store, Asian markets and sometimes in the dairy section of conventional grocery stores.
 Miso broth with Soba Noodles and Baby Bok Choy
Serves 4
4 cups water
3 TBLS miso paste - (Yellow, white or red. Yellow is the lightest flavor, red is the darker, more salty)
8 oz. firm or silken tofu - cubed
1/2 yellow onion, sliced thinly
3 carrots, cut into half moons
3-4 shitake mushrooms, thinly sliced
3 heads baby bok choy, bottom trimmed and washed
1 bunch soba or udon noodles
bunch of scallions thinly sliced for garnish
black sesame seeds for garnish
Spoon miso paste into a heat resistant cup or bowl and set aside.
Bring water to boil, add onion, carrot and tofu.
Boil for about 5 minutes, add shitake and bok choy, reduce to a simmer.
Add noodles and cook until done.
Add about 1/2 cup of simmering water into miso paste and stir well to combine miso into water. Pour this mixture into the soup and turn off heat.
Laddle into bowls and top with scallions and/or black sesame seeds.
Friday, April 24, 2009
Rosemary and Parmesan Flatbread
 Yvette showed me this recipe when I needed something special to make for a dinner party I was hosting. I didn't want to do the typical cheese and cracker set-up, (yawn), to snack on before dinner, but I also didn't have time, (nor energy), to come up with some wild and elaborate concoction. This flat bread fits perfectly into the category of rustic, simple, delicious and best of all, home-made with lots of love.
 This flat bread is less doughy and chewy, but more cracker-like. It has a crispiness which is great fun to break apart and dip into a gently softened goat cheese. Depending on the number of guests you are having, you may want to double the recipe, just in case. And if worse comes to worst, you have some left overs for the next day. It will keep nicely in an airtight container for a day or two.


Rosemary Parmesan Flatbread
Adapted from Gourmet Magazine, July, 2008.
4 servings
1 3/4 cups unbleached all-purpose flour
1 TBLS chopped fresh rosemary, plus two 6-inch long sprigs
1 tsp baking powder
3/4 tsp sea salt
1/2 cup water
1/3 cup olive oil plus more for brushing
1/2 cup freshly grated Parmesan
Flakey sea salt, such as Maldon
Preheat oven to 450, place heavy baking sheet, or pizza stone on middle rack.
Stir together flour, chopped rosemary, baking powder and salt in a medium bowl. Make a well in the center and then add water and oil and gradually stir into flour with a wooden spoon until dough forms. Knead dough on a work surface 4-5 times.
Divide the dough in to 3 pieces and roll out one piece, (keep remaining pieces under plastic wrap), on a sheet of parchment paper into a 1o inch roundish shape, dough should be thin.
Lightly brush olive oil on top and sprinkle with Parmesan cheese. Scatter small clusters of rosemary on top, pressing them into the dough. Sprinkle with salt. Slide dough, while still on parchment paper, onto preheated baking sheet or pizza stone.
Bake until pale golden, 8 - 10 minutes. Transfer flat bread, discard parchment, to a cooling rack, then repeat with remaining dough.


Saturday, March 28, 2009
Move over, oatmeal...

On this cold, overcast morning, I had oatmeal on my mind. In the way of my McCann's canister, was my forgotten jar of amaranth. If you have never tried this darling of a grain (actually it's a seed), I would like to introduce you to the wonderfully tiny and delicious ancient food. Used in cultures all over the world, amaranth, (an herb technically), is a powerhouse of nutrition, first used by the Aztecs, who believed it had supernatural powers and incorporated it into religious ceremonies.
The amaranth plant grows between 5 - 7 feet and has beautiful magenta flowers, or plumes. It's an easy plant to grow - drought and heat tolerant - and the leaves are similar to spinach in both flavor and nutrition values.

The seed, smaller than quinoa, is high in protein and iron as well as vitamin A and C. It contains two amino acids, (lysine and methionine), rarely found in grains. It is also high in calcium, five times more than milk, and is gluten - free.
Cooked amaranth is 90% digestible, therefore a great food option for people recovering from illness. For those with high blood pressure, amaranth can lower cholesterol and is high in linoleic acid.
Preparing amaranth is simple, I like it as a breakfast alternative to oatmeal and I fix it up the same way, with (almond) milk, fruit and honey. But you could also use it in place of quinoa or brown rice, or add it to other grains for a added punch of texture and flavor. It's sweet and malty, with a firm texture. With a distinctive "pop", amaranth has a unique texture as it holds it's integrity after it's cooked.
You can find amaranth seed in a natural food store - as far as the leaves, check your local farmer's market. Or even better, grow it yourself!
Breakfast cereal:
1 cup amaranth seed
2 1/2 cups water or apple juice
pinch of sea salt
Bring liquid to boil, slowly add seeds, stirring as you pour, add salt. Lower to simmer and cover for 18-20 minutes. Be careful not to over cook, as seeds will become gummy.

Subscribe to:
Comments (Atom)
